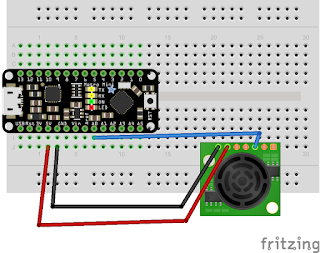
We are using the MaxSonar-EZ1 ultrasonic rangefinder. It will be connected to an Arduino (the Metro Mini by Adafruit). Setting up the sensor is very simple since the rangefinder only needs 5 volts and ground for power. The output indicating the distance an object is from the sensor can be obtained in a variety of ways. Here we use the analog signal marked
"AN". The connections look like this.The sensor continuously sends sonic pulses once the power connections are made to an Arduino that is powered. If you put your ear close to it, you can hear the ticking of the pulses. Although the sensor has three ways to measure a signal, the analog voltage output seems to be the most straightforward to use. The analog output is a voltage between 0 and 5 volts that is proportional to the distance an object is from the sensor. However, the Arduino reports this value as an integer between 0 and 1023. That is, 5 volts is reported as 1023 and 0 volts is reported as 0. Can you determine what value 2.5 volts is reported?
Once connected, we need to write a program to read the sensor and report the reading back to the computer. The code that is shown reads analog pin number 0 (A0) and stores the read value in a variable named ultrasonic_voltage. The value of ultrasonic_voltage is then written to the serial port and can be viewed by opening the Serial Monitor.
//This is a comment that does not affect the program.
//This program will read the analog 0 (A0) pin on an Arduino and report the value to the computer USB
int ultrasonic_voltage;//This is an integer variable that stores the analog reading
void setup() {
    // put your setup code here, to run once:
    Serial.begin(9600); //open communication between the Arduino and the computer
}

void loop() {
    // put your main code here, to run repeatedly:
    ultrasonic_voltage = analogRead(A0);
    //put the calibration equation here once you have it
    Serial.println(ultrasonic_voltage); //write to the USB
}
Several things to know about Arduino. The programming is strict. Be careful about semicolons (;), curly brackets ({}), and comments (//). The highlighting shows you in many cases when you have used something recognizable such as "Serial" or "analogRead". The Arduino can loop quickly. The actual speed depends on how big your program is. Generally speaking it can complete a loop in microseconds. Therefore, one may want to insert a delay of a few hundred milliseconds while calibrating the sensor. Anytime you make a change to the program, it needs to be recompiled and uploaded to the Arduino.| Ultrasonic Voltage | Distance (m) |
|---|---|
| 16 | 0.2 |
| 50 | 0.9 |
| 125 | 1.75 |
| 175 | 2.3 |
| 200 | 2.9 |
| 250 | 3.5 |
| 300 | 4.1 |
| 350 | 4.6 |
| 375 | 5.2 |
| 450 | 6.1 |
| 512 | 7.0 |
The trendline should be linear. Be sure to show the equation and R2 value. We now want to add this trendline to the Arduino code so that the serial port output is calibrated to real distance. To do this, a new variable should be created similar to
int ultrasonic_voltage;
However, we want the new variable to be capable of storing decimal numbers so it can report values down to 0.001 m (1 mm). To do this create a floating point variable on the line after the one shown above.
float distance;
In the Arduino program insert the trendline equation after the line with analogRead. Be sure to substitute the variable names "ultrasonic_voltage" and "distance" for x and y appropriately. And don't forget a semicolon at the end of the line. Finally, change the variable that is printed to the serial port to be distance. Recompile and upload this program. Test your calibration by repeating some measurements.
Questions to address:
- Is there a minimum and maximum distance that can be measured?
- Is there a minimum change in distance that can be measured?
- Does the minimum change that can be measured change with distance from the sensor?
Use the answers to these questions to summarize the capabilities of your sensor to measure distances. Use the ideas of absolute and relative uncertainty that we discussed in class.


No comments:
Post a Comment